Python Widget(tkinter) Frame
Once we create widgets or components, we can arrange them in the frame in a particular manner. Arranging the widgets in the frame is called 'layout management'.
Frame Layouts
There are three types of layout managers.
- Pack layout manager
- Grid layout manager
- Place layout manager
We will discuss about these layout managers one by one. Pack layout manager uses pack() method. This method is useful to associate a widget with its parent component. While using the pack() method, we can mention the position of the widget using 'fill' or 'side' options.
b.pack(fill=X)
b.pack(fill=Y)
The 'fill' option can take the values: X, Y, BOTH, NONE. The value X represents that the widget should occupy the frame horizontally and the value Y represents that the widget should occupy vertically. BOTH represents that the widget should occupy in both the directions. NONE represents that the widget should be displayed as it is. The default value is NONE. Along with 'fill' option, we can use 'padx' and 'pady' options that represent how much space should be left around the component horizontally and vertically.
For example,
b1.pack(fill=Y, padx=10, pady=15)# occupy vertically. Space on x-axis #10 px, on y-axis 15 px.
b2.pack(fill=X, padx=10, pady=15)# occupy horizontally. Space on x- #axis 10 px, on y-axis 15 px.
b3.pack(fill=X)# occupy horizontally. No space outside the widget
b4.pack(fill=X)# occupy horizontally. No space outside the widget
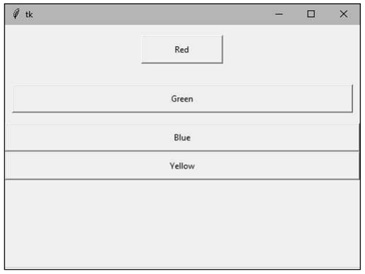 Arrangement of buttons using pack() method with 'fill' option
The pack() method can take another option 'side' which is used to place the widgets side by side. 'side' can take the values LEFT, RIGHT, TOP or BOTTOM. The default value is TOP. For example,
b1.pack(side=LEFT, padx=10, pady=15)# align towards left with 10 px #and 15 px spaces
b2.pack(side=LEFT, padx=10, pady=15)# align towards left with 10px and #15 px spaces
b3.pack(side=RIGHT)# align towards right with 0 px space around the #widget b4.pack()# align towards top with 0 px space around the widget
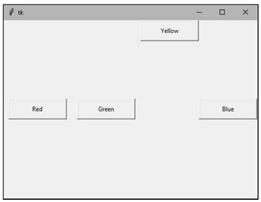 Arrangement of buttons using pack() method with 'side' option
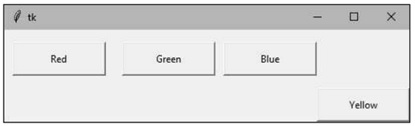
Grid layout manager uses the grid() method to arrange the widgets in a two dimensional table that contains rows and columns. We know that the horizontal arrangement of data is called 'row' and vertical arrangement is called 'column'. The position of a widget is defined by a row and a column number. The size of the table is determined by the grid layout manager depending on the widgets size.
b1.grid(row=0, column=0, padx=10, pady=15)# display in 0th row, 0th #column with spaces around
b2.grid(row=0, column=1, padx=10, pady=15)# display in 0th row, 1st #column with spaces around
b3.grid(row=0, column=2)# display in 0th row, 2nd column without spaces #around
b4.grid(row=1, column=3)# display in 1st row, 3rd column without spaces #around
The preceding statements will produce the following output,
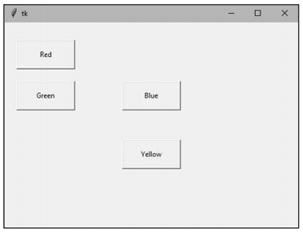
Place layout manager uses the place() method to arrange the widgets. The place() method takes x and y coordinates of the widget along with width and height of the window where the widget has to be displayed. For example,
b1.place(x=20, y=30, width=100, height=50)# display at (20, 30) #coordinates in the window 100 pxwidth and 50 pxheight
b2.place(x=20, y=100, width=100, height=50)# display at (20, 100)
b3.place(x=200, y=100, width=100, height=50)# display at (200, 100)
b4.place(x=200, y=200, width=100, height=50)# display at (200, 100)