Python Container
A container is a component that is used as a place where drawings or widgets can be displayed. In short, a container is a space that displays the output to the user.
Important Containers
There are two important containers:- Canvas : This is a container that is generally used to draw shapes like lines, curves, arcs and circles.
- Frame : This is a container that is generally used to display widgets like buttons, check buttons or menus. After creating the root window, we have to create space, i.e. the container in the root window so that we can use this space for displaying any drawings or widgets.
Canvas Container
A canvas is a rectangular area which can be used for drawing pictures like lines, circles, polygons, arcs, etc. To create a canvas, we should create an object to Canvas class as:
c = Canvas(root, bg="blue", height=500, width=600, cursor='pencil')
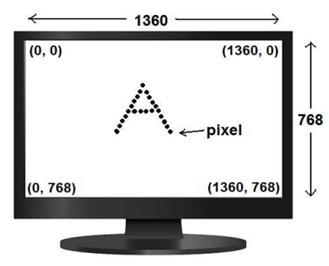
Here, 'c' is the Canvas class object. 'root' is the name of the parent window. 'bg' represents background color, 'height' and 'width' represent the height and width of the canvas in pixels. A pixel (picture element) is a minute dot with which all the text and pictures on the monitor are composed. When the monitor screen resolution is 1360 X 768 , it indicates that the screen can accommodate 1360 pixels width-wise and 768 pixels height-wise.
The option 'cursor' represents the shape of the cursor in the canvas. Important cursor shapes are: arrow, box_spiral, center_ptr, circle, clock, coffee_mug, cross, cross_reverse, crosshair, diamond_cross, dot, double_arrow, exchange, hand1, hand2, heart, left_ptr, mouse, pencil, plus, question_arrow, right_ptr, star, tcross, top_side, umbrella, watch, xterm, X_cursor.
 The pixels and screen coordinates
Colors in the canvas can be displayed directly by mentioning their names as: blue, lightblue, darkblue, red, lightred, darkred, black, white, yellow, magenta, cyan, etc. We can also specify colors using hexadecimal numbers in the format:
#rrggbb# 8 bits per color
#rrrgggbbb# 12 bits per color
Once the canvas is created, it should be added to the root window. Then only it will be visible. This is done using the pack() method, as follows:
c.pack()
After the canvas is created, we can draw any shapes on the canvas. For example, to create a line, we can use create_line() method, as:
id = c.create_line(50, 50, 200, 50, 200, 150, width=4, fill="white")
This creates a line with the connecting points (50, 50), (200, 50) and (200, 150). 'width' specifies the width of the line. The default width is 1 pixel. 'fill' specifies the color of the line. The create_line() method returns an identification number. To create an oval, we can use the create_oval() method. An oval is also called ellipse.
id = c.create_oval(100, 100, 400, 300, width=5, fill="yellow", outline="red", activefill="green")
'fill' represents the color to fill and 'outline' represents the color to be used for the border. The option 'activefill' represents the color to be filled when the mouse is placed on the oval.
A polygon represents several points connected by either straight lines or smooth lines. To create a polygon, we can use the create_polygon() method as:
id = c.create_polygon(10, 10, 200, 200, 300, 200, width=3, fill="green", outline="red", smooth=1, activefill="lightblue")
Here, the polygon is created using the points (10, 10), (200, 200), (300, 200) and then the last point is again connected to the first point, i.e. (10, 10). The option 'smooth' can become 0 or 1. If 0, it indicates a polygon with sharp edges and 1 indicates a polygon with smooth edges.
Similarly, to create a rectangle or square shaped box, we can use the create_rectangle() method as:
id = c.create_rectangle(500, 200, 700, 600, width=2, fill="gray", outline="black", activefill="yellow")
Here, the rectangle will be formed with the top left coordinate at (500, 200) pixels and the lower bottom coordinate at (700, 600). The color of the rectangle will change from gray to yellow when the mouse is placed on the rectangle.
It is also possible to display some text in the canvas. For this purpose, we should use the create_text() method as:
id = c.create_text(500, 100, text="My canvas", font= fnt, fill="yellow", activefill="green")
Here, the 'font' option is showing 'fnt' object that can be created as:
fnt =('Times', 40, 'bold') fnt =('Times', -40, 'bold italic underline')
Canvas Container Shapes
Python example for creation of various shapes in canvas
from tkinter import *
#create root window
root = Tk()
#create Canvas as a child to root window
c = Canvas(root, bg="blue", height=700, width=1200, cursor='pencil')
#create a line in the canvas
id = c.create_line(50, 50, 200, 50, 200, 150, width=4, fill="white")
#create an oval in the canvas
id = c.create_oval(100, 100, 400, 300, width=5, fill="yellow", outline="red", activefill="green")
#create a polygon in the canvas
id = c.create_polygon(10, 10, 200, 200, 300, 200, width=3, fill="green", outline="red", smooth=1, activefill="lightblue")
#create a rectangle in the canvas
id = c.create_rectangle(500, 200, 700, 600, width=2, fill="gray", outline="black", activefill="yellow")
#create some text in the canvas
fnt =('Times', 40, 'bold italic underline')
id = c.create_text(500, 100, text="My canvas", font= fnt, fill="yellow", activefill="green")
#add canvas to the root window
c.pack()
#wait for any events
root.mainloop()
from tkinter import *
#create root window
root = Tk()
#create Canvas as a child to root window
c = Canvas(root, bg="white", height=700, width=1200)
#create arcs in the canvas
id = c.create_arc(100, 100, 400, 300, width=3, start=270, extent=180, outline="red", style="arc")
id = c.create_arc(500, 100, 800, 300, width=3, start=90, extent=180, outline="red", style="arc")
id = c.create_arc(100, 400, 400, 600, width=3, start=0, extent=180, outline="blue", style="arc")
id = c.create_arc(500, 400, 800, 600, width=3, start=180, extent=180, outline="blue", style="arc")
id = c.create_arc(900, 400, 1200, 600, width=3, start=90, extent=90, outline="black", style="arc")
#add canvas to the root
c.pack()
#wait for any events
root.mainloop()
Images in Canvas Container
Python example to display images in the canvas
from tkinter import *
#create root window
root = Tk()
#create Canvas as a child to root window
c = Canvas(root, bg="white", height=700, width=1200)
#copy images into files
file1 = PhotoImage(file="cat.gif")
file2 = PhotoImage(file="puppy.gif")
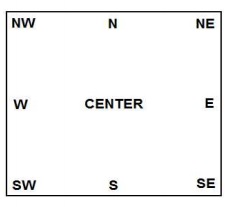
#display the image in the canvas in NE direction
#when mouse is placed on cat image, we can see puppy image
id = c.create_image(500, 200, anchor=NE, image=file1, activeimage=file2)
#display some text below the image
id = c.create_text(500, 500, text="This is a nice photo", font= ('Helvetica', 30, 'bold'), fill="blue")
#add canvas to the root
c.pack()
#wait for any events
root.mainloop()
Drawing in Canvas Container
Python program to display drawing in the canvas
from tkinter import *
root = Tk()
c = Canvas(root, bg="#091e42", height=700, width=1200)
#create the house
c.create_polygon(600,250,700,200,800,250,800,400,600,400, width=2, fill="yellow", outline="red")
c.create_line(600,250,800,250, width=2, fill="red")
c.create_rectangle(650,275,750,375, fill="red")
#create 3 bushes at left side of house
x1,y1=0,350
x2,y2=200,450
for i in range(3):
   c.create_arc(x1,y1,x2,y2, start=0, extent=180, fill="green")
   x1+=200
   x2+=200
#create 2 bushes at right side of house
c.create_arc(800,350,1000,450, start=0, extent=180, fill="green")
c.create_arc(1000,350,1200,450, start=0, extent=180, fill="green")
#display Moon image
file1 = PhotoImage(file="moon.gif") c.create_image(10, 100, anchor=NW, image=file1)
#display some text below the image
id = c.create_text(600, 600, text="My Happy Home!", font= ('Helvetica', 30, 'bold'), fill="magenta")
c.pack()
root.mainloop()
Frame Container
A frame is similar to canvas that represents a rectangular area where some text or widgets can be displayed. Our root window is in fact a frame. To create a frame, we can create an object of Frame class as:
f= Frame(root, height=400, width=500, bg="yellow", cursor="cross")
Here, 'f' is the object of Frame class. The frame is created as a child of 'root' window. The options 'height' and 'width' represent the height and width of the frame in pixels. 'bg' represents the back ground color to be displayed and 'cursor' indicates the type of the cursor to be displayed in the frame.
Once the frame is created, it should be added to the root window using the pack() method as follows: f.pack()
Frame with root window
from tkinter import *
#create root window
root = Tk()
#give a title for root window
root.title("My Frame")
#create a frame as child to root window
f= Frame(root, height=400, width=500, bg="yellow", cursor="cross")
 #attach the frame to root window
f.pack()
#let the root window wait for any events
root.mainloop()